ROS学习手记13 – 完成了初级的教程以后
完成了初级的教程以后
完成了初级的教程,我们理解了概念,但还需掌握运用ROS开发机器人的方法。
首先,要知道如何学习ROS,获取有关ROS的资讯。主要的学习和参考材料如下:
- ROS wiki官网的使用
- ROS 官网的API文档
- ROS 第三方教材,书籍
- 本博客的“ROS进阶学习手记”将是一个比较实用的路径
一个比较好的ROS教学大纲:
1. 关于ROS官网的layout(页面结构)情况
关于ROS官网的layout(资源分布)情况,我们要好好了解:http://wiki.ros.org/ROS/Tutorials/NavigatingTheWiki
- LandingPage上的导航栏主要有:文档, 包, 新闻三个栏目
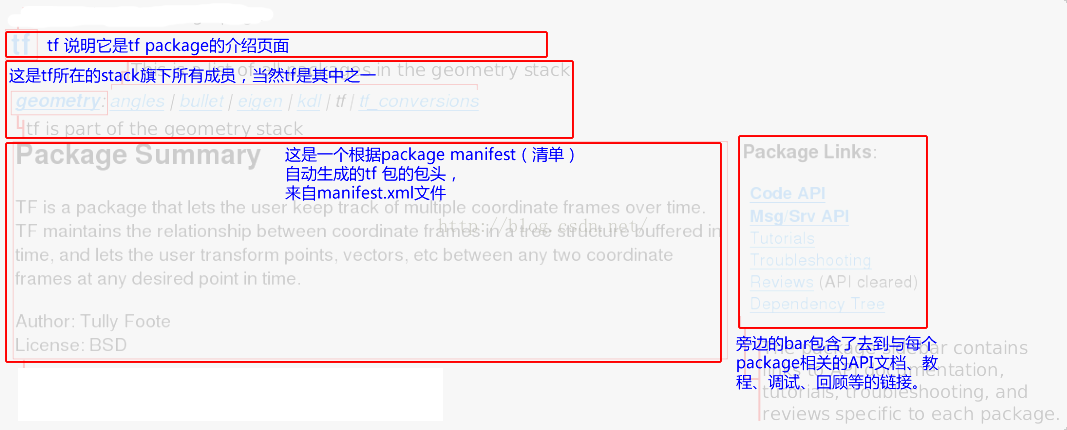
- 在ROS Package Pages里,结构是如下:
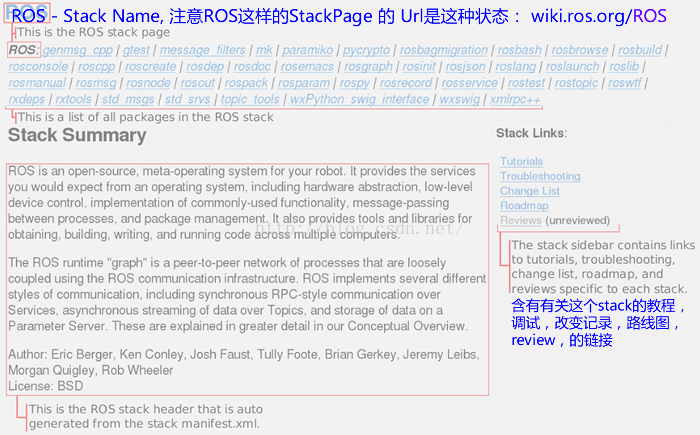
- 在ROS Stack Pages里,结构是如下:
2. 复习: ROS Stack Package等各元件结构:
[Stack1]
[Package1]
[Nodes1]
[Nodes2]
[Messages]
[Services]
[Libraries]
[Tools]
[/Package1]
[Package2]
[Nodes]
[Messages]
[Services]
[Libraries]
[Tools]
[/Package2]
[/Stack1]
[Stack2]
…
[/Stack2]
3. 可供参考的材料
========= 开发辅助文档 =========
在ROS的开发过程中,你会用到比较多的文档:
1. Packages’ List:
http://www.ros.org/browse/list.php
2. APIs’ List
http://wiki.ros.org/APIs
3. ROS cpp Dev Docs for API
http://docs.ros.org/diamondback/api/roscpp/html/index.html
4. ROS cpp
http://wiki.ros.org/roscpp
5.
========= 更多参考教材 =========
教材电子书:
- ROS by Example Hydro volume1 - pdf(第一卷,初级)
- ROS by Example Hydro volume2 - pdf(第二卷,高级)
- PacktPub.Learning.ROS.for.Robotics.Programming.Sep.2013
============= 个人计划目标 =============
【任务1】:
利用turtle_sim Node,完成一个从键盘输入int64 x, int64 y, int64 angle, int64_velocity的运动。
分析: 用my_drivenode1向topic=/turtle1/cmd_vel 发送Message
【任务2】:
学习 tf 和 urdf Package, 再用simulator: RViz 工具,完成对小车的建模,并用“任务1”中的my_drivenode1修改topic和数据格式,形成my_drivenode2向它发送位置指令,使它能接受键盘输入,并完成前进,后退,转弯90°功能。
【任务3】:
在自定义topic_name 和 Message 数据结构的协议下,写一个驱动小车轮子的驱动程序,使之可接受来自其他node的Message,完成动作。并在simulator里完成模拟。
【任务4】:
然后在实体小车上实现 任务3 的模拟效果。这里先要实现remote通信的问题,可参考running ROS on a Robot on youtube. 完成两台笔记本电脑之间的ROS通信。
【任务5】:
把现有的某一两个硬件驱动平台改造成可接收ROS Message的平台。这个任务就多了。
【任务6】:
有关机器视觉的ROS Nodes的运行
2. 我个人的初步计划是:
看能不能用ROS提供的机器人仿真平台,完成一些nodes的通信,导航的控制,实现几个由简单到复杂的机器人控制任务。
- 我的机器人小车的建模
- 我用键盘控制小车的Nodes,Message, Service, Parameter等的编写
- 小车位置反馈与自动控制,实现小车的按轨迹运动
- 小车的蔽障算法的实现和模拟
- 实际小车的运动控制,比如通过键盘进行控制
- 嵌入式ARM系统的ROS运行与控制
- 利用kinect和机器人小车实现实际环境的蔽障任务
- ROS Industrial的学习和开发
ROS Industrial 是 ROS 开发组织针对工业应用的开发工具,也是我最感兴趣的学习和研究方向。
============================
Where Next?
Description: This tutorial discusses options for getting to know more about using ROS on real or simulated robots.
Tutorial Level: BEGINNER
目录
At this point in the beginner’s tutorials you should have an understanding of the core concepts of ROS.
Given a robot that runs ROS, you could use this understanding to list topics published and subscribed by the robot, to identify the messages consumed by these topics and then write your own nodes that process sensor data and act in the world.
The real attraction of ROS is not the publish/subscribe middle-ware itself but that ROS provides a standard mechanism for developers around the world to share their code. The best “feature” of ROS is its enormous community.
The number of packages available can be overwhelming. This tutorial attempts to give you an idea of what to explore next.
Launching a Simulator
Even if you have a real robot, it is good to get started using a simulator so that if something goes wrong you don’t injure yourself or damage an expensive robot.
You can get started with the PR2 Simulator or the Turtlebot Simulator. Alternately, you might search for your robot and check whether it has a simulator of its own.
At this point, you might try to control the simulated robot using a ’teleop’ package (e.g.,turtlebot_teleop) or use your understanding of ROS to find a topic and write code that sends an appropriate message to drive your robot.
Exploring RViz
RViz is a powerful visualization tool that allows you to view the robot’s sensors and internal state. Theuser guide will help you get started.
Understanding TF
The TF package transforms between different coordinate frames used by your robot and keeps track of these transforms over time. A good understanding of TF is essential when working with any real robot. It is worthwhile to work through the tutorials.
If you’re building your own robot, you might at this point consider constructing aURDF model for your robot. If you’re using a “standard” robot then one has probably already being built for you. Nevertheless, it may be worthwhile to briefly familiarize yourself with theURDF package.
Going Deeper
At this point, you’re probably ready to start getting your robot to perform more sophisticated tasks. The following pages may help you:
- actionlib - The actionlib package provides a standardized interface for interfacing with preemptible tasks. This is widely used by “higher-level” packages in ROS.
- navigation - 2D navigation: map-building and path planning.
- MoveIt - To control the arms of your robot.
Working through the Official ROS Tutorials
Before diving into the Beginner Tutorials on the ROS Wiki, it is highly recommended
that you look first at the ROS Start Guide. Here you will find an overall introduction as
well as an explanation of the key concepts, libraries and technical design.
The official ROS Beginner Tutorials are superbly written and have been tested by many
new ROS users. It is therefore essential to begin your introduction to ROS by running
through these tutorials in sequence. Be sure to actually run the code samples—don’t just
read through them. ROS itself is not difficult: while it might seem unfamiliar at first,
the more practice you have with the code, the easier it becomes. Expect to spend at least
a few days or weeks going through the tutorials.
Once you have completed the beginner tutorials, it is essential to also read the
tf
overview and do the
tf Tutorials which will help you understand how ROS handles
different frames of reference. For example, the location of an object within a camera
image is usually given relative to a frame attached to the camera, but what if you need to
know the location of the object relative to the base of the robot? The ROS tf library
does most of the hard work for us and such frame transformations become relatively
painless to carry out.
Finally, we will need to understand the basics of ROS actions when we get to the
Navigation Stack. You can find an introduction to ROS actions in the
actionlib
tutorials.
You will notice that most of the tutorials provide examples in both Python and C++. All
of the code in this book is written in Python, but if you are a C++ programmer, feel free
to do the tutorials in C++ as the concepts are the same.
Many individual ROS packages have their own tutorials on the ROS Wiki pages.
Refer to them as needed . but for now, the Beginner, tf, and actionlib tutorials will suffice.
ROS中关于Navigation的名词解释:
footprint – 机器人垂直投影外形,简称足迹
obstacles – 障碍
cost map – 一种表示环境可穿越性的地图,可由障碍物数据、已有地图模型、机器人自身半径、机器人转弯半径等生成。
例: Evaluate the footprint of robots against a cost map.
评估在cost map中,机器人的垂直投影外形。
When operating in cluttered spaces it therefore becomes important to evaluate the footprint of these robots against a cost map.
Our method involves a transformation of the set of points covered by the footprint of the robot into
two sets of points: points that should be evaluated against the cost map with inflated obstacles,
and points that should be evaluated against the original cost map.