Start a lvgl project on ESP32 with vsCode, platformIO on Arduino platform
WARING : The version confilict problem may crazy you if you play lvgl on Arduino platform. Fortunately, this post offers you one solution for version_conflict problem.
This is the sister post for ‘Complile the lvgl sample proj in vsCode with ESP-IDF extension’. The difference is the dev-kit based on Arduino vs ESP-IDF.
Here, we use Arduino + platformIO in vsCode for developing ESP32 SoC project with lvgl GUI.
Prerequisit
- knowledge and experience about develop ESP32 basic blink project using vsCode+platformIO
Steps for Arduino_LVGL env configuration
in condition of vsCode+platformIO configured, do the steps blow:
step1: use platformIO to create a project in vsCode.
Let’s name it and put it into .../urdev_proj/esp32_lvgl_Arduino_1stProj
select board on your situation: esp32 dev kit v1
click ‘create’ to create the proj folder.
configure the monitor_speed = 115200; upload_speed = 460800 in platformio.ini
step2: install the libraries need by this project
Install the libraries needed, in platformio:
- TFT_eSPI
- lvgl
- lv_examples
step3: configure the TFT_eSPI library
To get started it’s recommended to use TFT_eSPI library as a TFT driver to simplify testing.
To make it work, setup TFT_eSPI according to your TFT display type via editing either User_Setup.h or by selecting a configuration in the User_Setup_Select.h
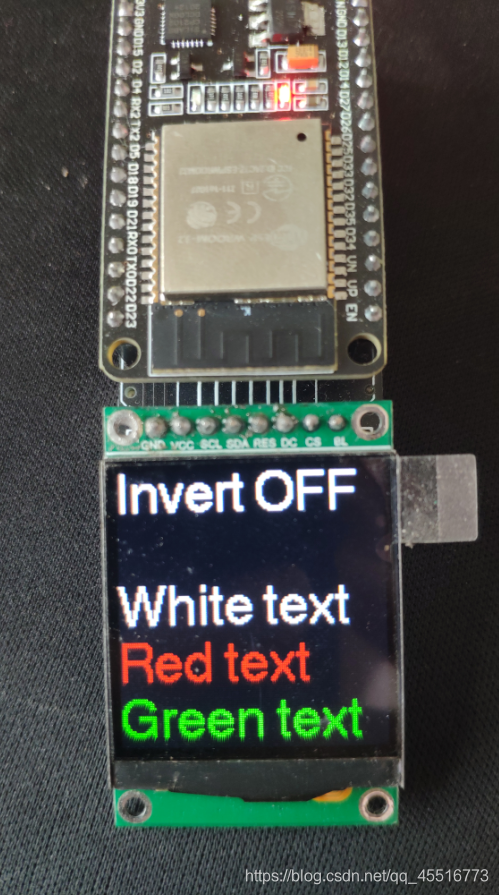
step4: test the TFT_eSPI example code “colour_test”
Go to .pio/libdeps/esp32doit-devkit-v1/TFT_eSPI/examples/Test and diagnostics/Colour_Test/Colour_Test.ino copy the code into ./main.cpp
Now try building the project and you may meet error about missing the lv_conf.h and lv_demo_conf.h file.
Copy and rename the two files:
.pio/libdeps/esp32doit-devkit-v1/lvgl/lv_conf_template.h
and
.pio/libdeps/esp32doit-devkit-v1/lv_examples/lv_demo_conf_template.h
rename them as lv_conf.h and lv_demo_conf.h respectively.
Here, we don’t need to edit the two conf files for tesing the TFT_eSPI while needing to edit it in the next step for lvgl testing.
Try to build the project and the 5 lines of text will be displayed on TFT screen. ;-)
as below:
step5: Configure the lvgl and lvgl_example library
configure the lvgl
open .pio/libdeps/esp32doit-devkit-v1/lvgl/lv_conf.h
edit it and ref below lines:
      #if 0 /*Set it to "1" to enable content*/
      #define LV_ATTRIBUTE_MEM_ALIGN_SIZE 1     // 1(default) vs blank
      #define LV_TICK_CUSTOM 1                  // 1(default) vs 0
configure the lv_example
open ‘.pio/libdeps/esp32doit-devkit-v1/lv_examples/lv_demo_conf.h’, edit it:
change the first #if 0 to #if 1
      #define LV_USE_DEMO_WIDGETS     1
      #define LV_USE_DEMO_BENCHMARK   1
step6: Testing the lvgl_example
go to .pio/libdeps/esp32doit-devkit-v1/lvgl/examples/arduino/LVGL_Arduino/LVGL_Arduino.ino and use code of it in ./main.cpp
build and upload the binary into chip.
RESET the chip and the screen does NOT show the demo UI. There is problem about the version compatibility of the three libraries.
=========================
Using the specific version of lvgl to fix the above issue.
Steps:
1. Build a new platformio proj. on Arduino platform.
2. Modify the platformio.ini file, let it install the libdeps
3. configure the 3 libraries using the lv_demo_conf.h, lv_conf.h, User_Setup.h given by seller.
4. Use the src/main.cpp given by seller.
Build and let it report error.
5. replace the .pio/libdeps/lvgl with that given by seller.
Build and let it report error.
6. fix the head file path issue for 3 files at: .pio/libdeps/esp32doit-devkit-v1/lv_examples/src/lv_demo_widgets/assets/
Build, flash and see the benchmark demo on your ESP32-driven TFT screen.
Tips:
For step 1:
  proj_name: esp32_lvgl_Arduino_5thProj
  target:    ESP32_DOIT_DevKit_v1
  platform:  Arduino
For step 2:
The content of platformio.ini :
      [env:esp32doit-devkit-v1]
      platform = espressif32
      board = esp32doit-devkit-v1
      framework = arduino
      monitor_speed = 115200
      upload_speed = 460800

      lib_deps =
         lvgl/lvgl@^8.0.1
         lvgl/lv_examples @ 8.1.0-dev
         bodmer/TFT_eSPI@^2.3.70       ;  it seems to use v2.4.25, but configure it here as 2.3.70 is crucial. this will make the lv_example into 8.1.1-dev
Further testing is encouraged for the readers.
The seller-given files are packed in “LVGL For ESP32 PlatformIO” at url: https://pan.baidu.com/s/1-1P31U7mmJ_GIKT6cSZxxw (PIN code: 3aj6)
===========================
Using specific versions of lvgl, TFT_eSPI, lv_examples
edit the platformio.ini as below:
        [env:esp32doit-devkit-v1]
        platform = espressif32
        board = esp32doit-devkit-v1
        framework = arduino
        monitor_speed = 115200
        upload_speed = 460800

        lib_deps =
           TFT_eSPI
           lvgl/lvgl@^8.0.1
          lvgl/lv_examples @ 8.1.0-dev
the platformio will auto configure the .pio/libdeps/xxx after the platformio.ini saved.
Three lib_deps will be downloaded into .pio/libdeps
copy the lib from buildable project:
You can select one of the below lib-installing methods:
Method1:
      - replace the .pio/libdeps with the whole `.pio/libdeps` given by seller
         Build : Success
Method2:
      - replace the
            .pio/libdeps/TFT_eSPI
            .pio/libdeps/lvgl
            .pio/libdeps/lv_examples/lv_demo_conf.h

            Build : Fail

            Then, modify the files:
            `  .pio/libdeps/esp32doit-devkit-v1/lv_examples/src/lv_demo_widgets/assets/img_clothes.c`
            `  .pio/libdeps/esp32doit-devkit-v1/lv_examples/src/lv_demo_widgets/assets/img_demo_widgets_avatar.c`
            `  .pio/libdeps/esp32doit-devkit-v1/lv_examples/src/lv_demo_widgets/assets/img_lvgl_logo.c`
            Edit the line 4 `#include "lvgl/lvgl.h"` into `#include "lvgl.h"`
            Build : Success.
Method3:
      - replace the
            .pio/libdeps/lvgl
            .pio/libdeps/lv_examples/lv_demo_conf.h

            edit the platformio.ini as :

            lib_deps =
               lvgl/lvgl@^8.0.1
               lvgl/lv_examples @ 8.1.0-dev
               bodmer/TFT_eSPI@^2.3.70


            configure the three libs and modify the files:
            `  .pio/libdeps/esp32doit-devkit-v1/lv_examples/src/lv_demo_widgets/assets/img_clothes.c`
            `  .pio/libdeps/esp32doit-devkit-v1/lv_examples/src/lv_demo_widgets/assets/img_demo_widgets_avatar.c`
            `  .pio/libdeps/esp32doit-devkit-v1/lv_examples/src/lv_demo_widgets/assets/img_lvgl_logo.c`
            Edit the line 4 `#include "lvgl/lvgl.h"` into `#include "lvgl.h"`
            Build : Success.
More analysis:
        Further compare the `.pio/libdeps/lvgl` with buildable `.pio/libdeps/lvgl`, A large amount of modifications exists.
        I don't know which version of lvgl does the buildable `.pio/libdeps/lvgl`. Now temporaryly use the seller offered `.pio/libdeps/lvgl`. :(
        Looks like we need to use the lvgl given by seller.

        Further compare teh `.pio/libdeps/TFT_eSPI`. Looks like the buildable TFT_eSPI uses v2.3.70
        Restore the TFT_eSPI with platformio given. replace the `User_Setup.h` with that offered by seller.
        Build Success.
References and resources:
- https://docs.lvgl.io/latest/en/html/get-started/arduino.html
- https://www.bilibili.com/read/cv13793415
- https://www.cxybb.com/article/qq_45516773/119673328
The seller-given files are packed in “LVGL For ESP32 PlatformIO”, which can be downloaded from:
https://pan.baidu.com/s/1-1P31U7mmJ_GIKT6cSZxxw (PIN code: 3aj6)
https://app.mediafire.com/cfw9dsgklxs5g (international visitor)